RouteSavvy User Guide – 7.4 Using the RouteSavvy Mobile App
Using the RouteSavvy Mobile App
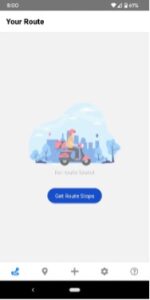
When opening the RouteSavvy mobile app, it should open to the Routes tab. If this does not happen, simply navigate to the Routes tab.
PLEASE NOTE! Once a route has been sent to a device, it cannot be deleted
from within the mobile app on the device. This must instead be done within the
RouteSavvy software project itself. If the routes are not deleted after they have
been completed, then the mobile user will see all routes that have ever been sent
to the device. In the example of a driver executing a different route every day,
this would obviously become very cumbersome over time. So it is important to
develop and adhere to workflows that utilize best practices regarding deleting
routes from devices once routes have been completed. If the driver only wants
to see each individual route on the day it is being executed, then the route
planner needs to be sure to delete the route from the device on a daily basis after
route completion. Once the route planner has finalized the route in RouteSavvy
software, the route should then be sent to the mobile device. Once the driver
has completed the route, and is sure that sync is complete, the route planner
should be sure to download the Completed Stops and any Fixed Locations in the
RouteSavvy project as desired, and then delete the route from the device. More
information regarding this process follows. If the mobile user sees multiple
routes that have already been completed in the Routes tab, then it is likely that
the routes are not being deleted after execution as described here.
You may need to refresh the Routes using the Sync icon in the top right corner of the screen. If the correct route is not displayed, press the Routes drop down arrow and select the correct route from the drop down menu. The Current Route is displayed next to the Routes drop down arrow.
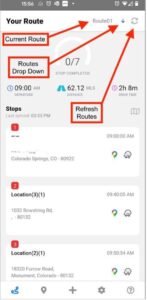
Press the Google or Waze App button next to the desired stop in order to use
either of these apps for navigation. This will send the location information to the
respective app and allow live navigation. You can choose to use one app or the
other, or switch back and forth between the Google and Waze apps within the
same route. This is an iterative process that must be done for each stop within
the route once the previous stop has been completed. To begin the route, the
mobile user will be at whatever location they are beginning the route, and they
will select the first stop from the mobile route. Clicking on either the Google or
Waze buttons will load that location as the destination and allow for navigation.
Once that first stop has been completed, the user then loads the next stop in the
mobile route, and similarly clicks on the Google or Waze buttons, and then
navigates to the next destination, and so on. Please note that either of these
navigation apps may send the driver on a different set of turn-by-turn directions
than may have been generated when initially planning the route in RouteSavvy
software. This is not a concern, as the driver will still always end up at the same
destination. This is actually an advantage, as the two apps utilize live, real-time
traffic information and will send the driver on the most efficient route to get to
each stop based on current traffic data at the time the route is being driven.
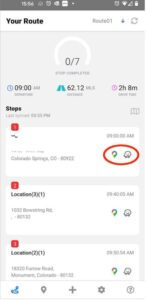
After the stop is complete, press anywhere in the stop frame (except for the Google or Waze button area) to go to the Location menu, where you can press “Mark Stop Complete”.

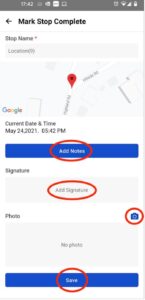
On the “Mark Stop Complete” menu, you can choose to “Add Notes” to the location. These notes will upload to the Completed Locations in the RouteSavvy web application. Touch inside the Signature box to add a signature, or touch the Camera icon to add a photo. When you’re done, press the “Save” button. Once a route has been completed, it is important to also be sure to sync by clicking the refresh button on the Route tab. This will ensure that all information collected in the app has been synced with the RouteSavvy software project.
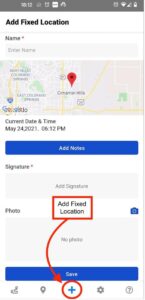
Fixed Locations can be used to capture location information for a stop that may not have initially been planned in the route. To create a new Fixed Location, press the “+” icon at the bottom of the screen to reach the Add Fixed Locations tab. This feature captures the current location of your phone and adds it to the RouteSavvy web application as a Fixed Location. As with a completed stop, you may Add Notes, Add Signature, or Add Photo.
At the end of the day, after the route has been completed, the mobile user should be sure to check the Fixed Locations tab to ensure that all completed stops have been uploaded. If any locations have not uploaded automatically, press the Sync icon to upload them.
![]()
