
This guide covers everything needed to get started quickly and easily with RouteSavvy, including:
- How to format spreadsheets of customer addresses.
- How to upload spreadsheets to RouteSavvy to create single or multiple routes simultaneously.
- How to dispatch your routes in mere minutes.
- How to back up your RouteSavvy project.
Formatting Your Spreadsheet
Data formatting is simple with RouteSavvy. For a sample spreadsheet that shows how to format your data, please download the .CSV or the .XLSX files here. Your spreadsheet will need to be in one of these two file formats. Please notice on the sample that the first row is the header row, and each column has a header that tells RouteSavvy how to handle that column. Each row after the header row is one location.
Good formatting is the easiest way to ensure your experience with RouteSavvy goes smoothly.
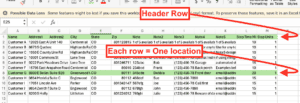
The default fields include Name, Address1, Address2, City, State, Zip, Country, Note, Note2, Note3, Note4, Note5 Full Address, Stop Time Minutes, Folder, Latitude, and Longitude.
The preferred address format is “Address1, Address2, City, State, Zip, Country“. Use abbreviations for all addresses, for example, “CT” instead of “Court”, or “AVE” instead of “Avenue” and always use the two-letter abbreviation for the state or province, since RouteSavvy will read and geocode the address more accurately this way. An address OR latitude and longitude is required to map and route a location. While an address can often be found with only Address1 and ZIP, always include as much information as is available to avoid any confusion.
You may use Full Address as a replacement for the segmented address fields Address1 + Address2 + City + State + Zip + Country. For example: “12023 East Arapahoe RD Unit 140, Centennial, CO, 801123815, USA”. This means that if you have your addresses in separate columns, or if your addresses are in one single column, RouteSavvy can still read it, you do not have to change the format of your spreadsheet.
Latitude and Longitude should only be used in specialty scenarios where an address is unavailable. Examples of applications that may require latitude and longitude include utilities maintenance or rural applications where the driver or technician is not being sent to an address. If addresses are available for your locations, please do not include any Latitude and Longitude in your spreadsheet for RouteSavvy.
We recommend using Stop Time, which is the number of minutes you expect the driver or technician will need to service each location. While Stop Time is optional, if you do not enter a stop time, RouteSavvy will only be able to calculate the drive time of the routes, not how long it will take to service them. To add Stop Time to your spreadsheet, simply use any empty column and type “Stop Time” in the header row. In the Stop Time column, enter the number of minutes you expect the driver or technician will need to service each location. Stop Time can only be an integer, so use only whole, non-decimal, non-fractional, positive numbers. This number can vary by location, and you can change it later.
There are 5 optional notes fields (Note, Note 2, Note 3, Note 4, and Note 5) that can be used for any information you want, such as phone number, email, special instructions, or product number. These fields should be used to keep helpful information at your driver’s or technician’s fingertips in the field. The notes fields on a route are typically always visible to the driver in the field; we recommend limiting this information to things that are needed for field operations.
Common Issues:
Many spreadsheets contain empty rows at the top. Often, these rows are helpful to the person using the spreadsheet, but they will only confuse any software that tries to import your data.
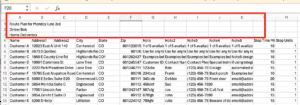
In the case above, you would need to delete the 3 highlighted rows, so that your Header row is Row 1. You can simply highlight these rows, right-click, and then click “Delete”. After that, save your spreadsheet and it will be ready to upload, as long as the rest of the formatting is correct. Lastly, avoid any empty rows in the middle of your spreadsheet, RouteSavvy will read each empty row as a bad address.
If you experience any issues with formatting or uploading your data, please email us at support@routesavvy.com and attach your spreadsheet. We are always happy to take a look, make a few quick changes, and send it right back to you.
There are multiple ways to create a Quick Route.
The first way is to drag your file into the gray box (1) on the “Welcome to RouteSavvy” dialog box when the RouteSavvy page first opens. This will begin the data import process. The second way (2) is to click “Choose File” and browse to the location of your spreadsheet. Once the spreadsheet is selected, click on the large green “Create Route” button.


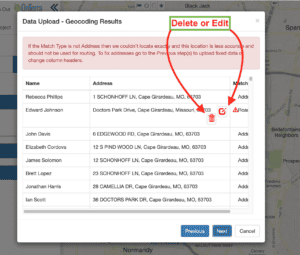
Geocoding Results
This dialog box is where RouteSavvy returns address matches. If you see the red error message at the top that says “If the Match Type is not Address…” then you will need to scroll through the list to find which address(es) were not found.
To resolve any errors, you can choose to delete the address for now and enter it later, or you can click the edit button and correct the address now. If you do not see the red “Match Type” error, this means all of your addresses are good.
Route Options
In the next dialog, “Route Options”, you can choose a name for your route, and the default start and end. This default start and end will be pre-populated in the routes you are creating now, as well as any future route you create until you change it.
To make a round trip, use the same address for both the start and end. RouteSavvy also allows for an end-to-end route, simply choose the desired start and the desired end. Please note that you can search in the “Route Start Location” and the “Route End Location” boxes using an address, or by using points of interest, such as “LaGuardia Airport”.

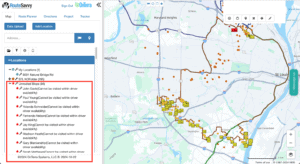
If you do not have enough drivers available to service all your stops, then you will see the “Some Stops are not routed” message.
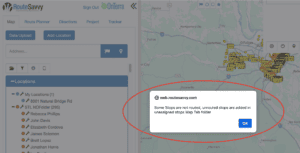
If this is the case, scroll down the Map tab to find a folder named “Unrouted Stops”. You may need to add another Vehicle, expand driver availability, or service these stops another day, according to your business needs.
Dispatch
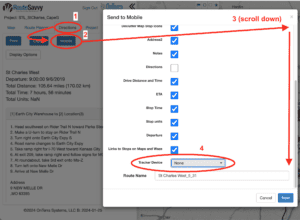
On the Directions tab, use the “Mobile” button to send a route to the RouteSavvy Mobile App (please see this article for a detailed guide on how to set up the Mobile App).
Once the Mobile App is set up for use, go to the Directions tab (1) and click the “Mobile” button (2). Scroll to the bottom of the “Send to Mobile” dialog box (3), then select the mobile device you wish to send the route to (4). Lastly, press “Next” and RouteSavvy will display a confirmation message that the route was sent. The route will be available on the mobile device in a matter of seconds.
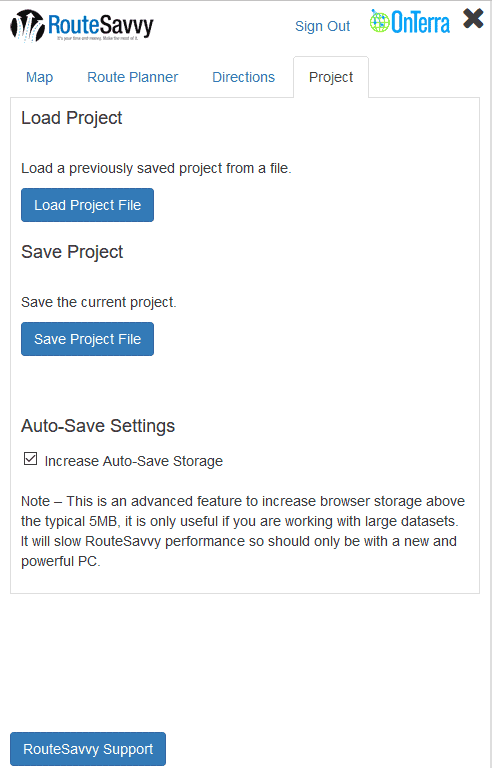
Backup
Lastly, the Project tab allows you to back up your work to your hard drive by clicking on “Save Project File” and to change the RouteSavvy global settings, such as route start time, and default start and end, by clicking on “Edit Settings”.
If you have questions, please contact RouteSavvy Support.